

There are four main steps for sharpening either a standard chef knife or Japanese chef’s knives such as Deba, Sashimi, Usuba, etc. These steps include:
1. Sharpen the tip of the knife
2. Sharpen the whole cutting edge from the tip of the knife to the heel of the blade
3. Remove the burr
4. Kobatsuke (for intermediate and advanced users)
If you’re sharpening a knife for the first time, please only do steps 1 and 2.
Once you gain more experience, you will be able to sharpen as well as a chef from step 1.
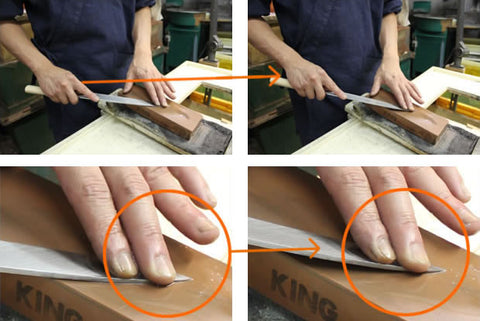
Step 1 – Sharpen the Tip of the Knife
First, sharpen the tip of the chef knife. Even if this part is aligned with the shinogi line, the blade will not come in contact with the whetstone, so you can’t just sharpen normally. Therefore, raise your right hand a little bit. It's easier if you raise from your elbow rather than raise your wrist. By doing so, the angle at which the knife strikes will change and the tip will easily come into contact with the stone.
As for how to apply force, it should be applied on the spine of the knife. Raise your right hand slightly, and adjust so that the tip of the chef knife strikes the whetstone. If it feels like the whetstone is making a crunching sound, then you're doing fine. By changing the angle, the tip of the knife will come in contact with the stone.
Step 2 – Sharpen the Whole Cutting Edge from the Tip of the Knife to the Heel of the Blade
The knife will only be sharpened where the fingers of the left hand are placed. The angle of the blade should be about 45 degrees to the whetstone.
For the sharpening angle, place the knife on the stone, hold down the cutting edge so that the blade is slightly levered up to the right angle, and sharpen.

Place your left hand in the place you want to sharpen, move back and forth around 20 times, and sharpen until the burr appears.
At this time, apply force when pushing, and relax the force when pulling back towards you.
Repeat this process for the whole cutting edge.


Burr: A burr (steel ridge) is formed on the back of the cutting edge. You should feel your fingers catch on it if you move them across it horizontally.
Step 3 – Remove the Burr
If you do not remove the burr on the back of the knife, the knife will not be able to cut.
Expansion→(1) A burr after proper sharpening, (2) A burr at the stage where the blade is not ground yet
In order to remove the burr, the surface of the whetstone must be flat. If it is uneven, please straighten before sharpening.
The back of the chef knife is sharpened in order to remove the burr, so the back of the knife is applied to the whetstone. If too much force is applied, it may also cause chipping of the blade, so please sharpen without using too much strength. It is enough to do each part where you place your hand 2 or 3 times. If you raise the cutting edge a little as you do it, the back of the tip of the blade will contact the stone nicely. Sharpen the back of the knife by placing it firmly against the whetstone.
* Do not sharpen at an angle here.


*Sharpen the cutting edge at 90 degrees to the whetstone.

*There is a burr on the cutting edge

*After the burr was cleanly removed
Step 4 – Kobatsuke (intermediate and advanced users)
In a nutshell, kobatsuke means to make a two-stage blade. If you do not do the kobatsuke process, the cut quality will diminish more quickly. By giving Japanese chef knives a two-stage blade, the cutting edge becomes stronger and cut quality is retained. Anyone who fillets a lot of fish in a day should be sure to do this kobatsuke process.
Many of our customers who are Japanese restaurant chefs, sushi chefs and fishmongers use this method of sharpening.
Be sure to use a finishing whetstone. Because it’s being made into a two-stage blade, the knife needs to be at a fairly steep angle. At this time, you don't need to use much power. It's enough to just relax and stroke.
Please apply in order from the tip to the blade heel. Sharpen about 10 times per place. It may seem scary at first, so please sharpen slowly.

If you get burrs, remove them as usual. Take the tip and sharpen the heel several times with the knife blade at 90 degrees to the whetstone.

